Labels
Through this work flow, you can generate address labels for mailings, contact information for a Rolodex, name tags, and more.
Access Labels
To access from the Button Bar, go to Reports/Exports > Reports & Labels > Labels.

To select who should have labels generated, enter criteria in the Step 1 - Select Who screen.
Step 2 - Label Layouts
One label per
On the next screen, you'll select your label layout from the drop down and whether you want
-
One label for each Individual
-
One label for each Giving Unit (those marked as Gives with Family)
-
One label for each Family (one label per household)
Names vs. Mailing Label
There are two templates available for the most common address label size, an Avery 5160.
-
[Template] Avery 5160 With Mailing Label
-
[Template] Avery 5160 With Name(s)
The Mailing Label option works well when you're addressing mail to a household. Examples of Mailing Labels might include Mr. & Mrs. Brown or The Jones Family. Choose the template with names works well when you're addressing an individual. If you select the name field and one label for family, each family member name will be included, separated by commas.
Label Options
Date of Mailing
The date of mailing is used to determine which address to use when someone has an alternate address.

Start Position
Adjusting the start position will move the position of the first label so that you can use a partial sheet of labels. The start position moves down and then across.
Postage $aver
Click the checkbox to use Postage $aver for Bulk Mailings.
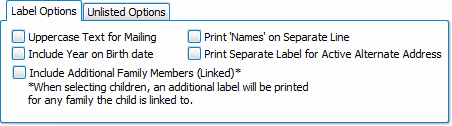
Label Options
-
Postal Addressing Standards outlined in Publication 28 by USPS recommend using uppercase for mailing labels.
-
If your labels include a date of birth, select whether to include the year.
-
When a child is linked to two households, you can opt to print a label for both addresses.
-
If you have both the Mailing Label and Names included on a label, you can choose to have first names printed on their own line.
-
Choose whether to print a separate label for an active alternative address.
Label Layouts
Create a New Label Layout
-
Click New
-
Select the Brand and Product number of your label sheet
If your product is not listed, you can manually adjust the dimensions of a similiarly sized label by clicking Next.
-
Click Finish
-
In the Label Designer, choose the fields you want to include on your label.
The default of Mailing Label and Current Address Block will be included in the grid area. Click this box and press DEL to erase this default. To include other fields, locate Data Controls in the lower right. Click and drag the fields to include into the grid area.
-
Select a field and use the controls at the top of the screen to the make any changes to the font, size, or text decoration.
-
Click Save As... and name the layout.
Using Existing Label Layouts
-
In the Step 2 window, extend the dropdown under label layout.
Templates will be at the end of the list and saved layouts will be sorted alphabetically.
-
Select your desired layout and click Print to use with current criteria.
Click Edit to make changes to the layout. After editing, click Save As... to save a new one or Save to overwrite the existing layout.
Click the minus button to delete a layout.
Giving/Pledging Date Range

This date range dictates what is shown on this report. This is different than the Giving/Pledging criteria as set in Step 1 which determines who makes it into the listing. For example, you could ask for a list of people who haven't had giving in the current year in Step 1 and create a report that displays their giving in the previous calendar year.
Organization Info

This tab allows you to adjust the information that comes in from System Information.
To add another set of contact information click the  or click the
  to edit existing. This will change the information included in report headings, but will not make changes to System Information.